
Damp Patch on Ceiling: Find the Source Before You Fix the Stain
A damp patch on a ceiling comes from the room above, the roof or loft condensation. How to tell which, safe checks, who to call and what not to do.
Quick answer
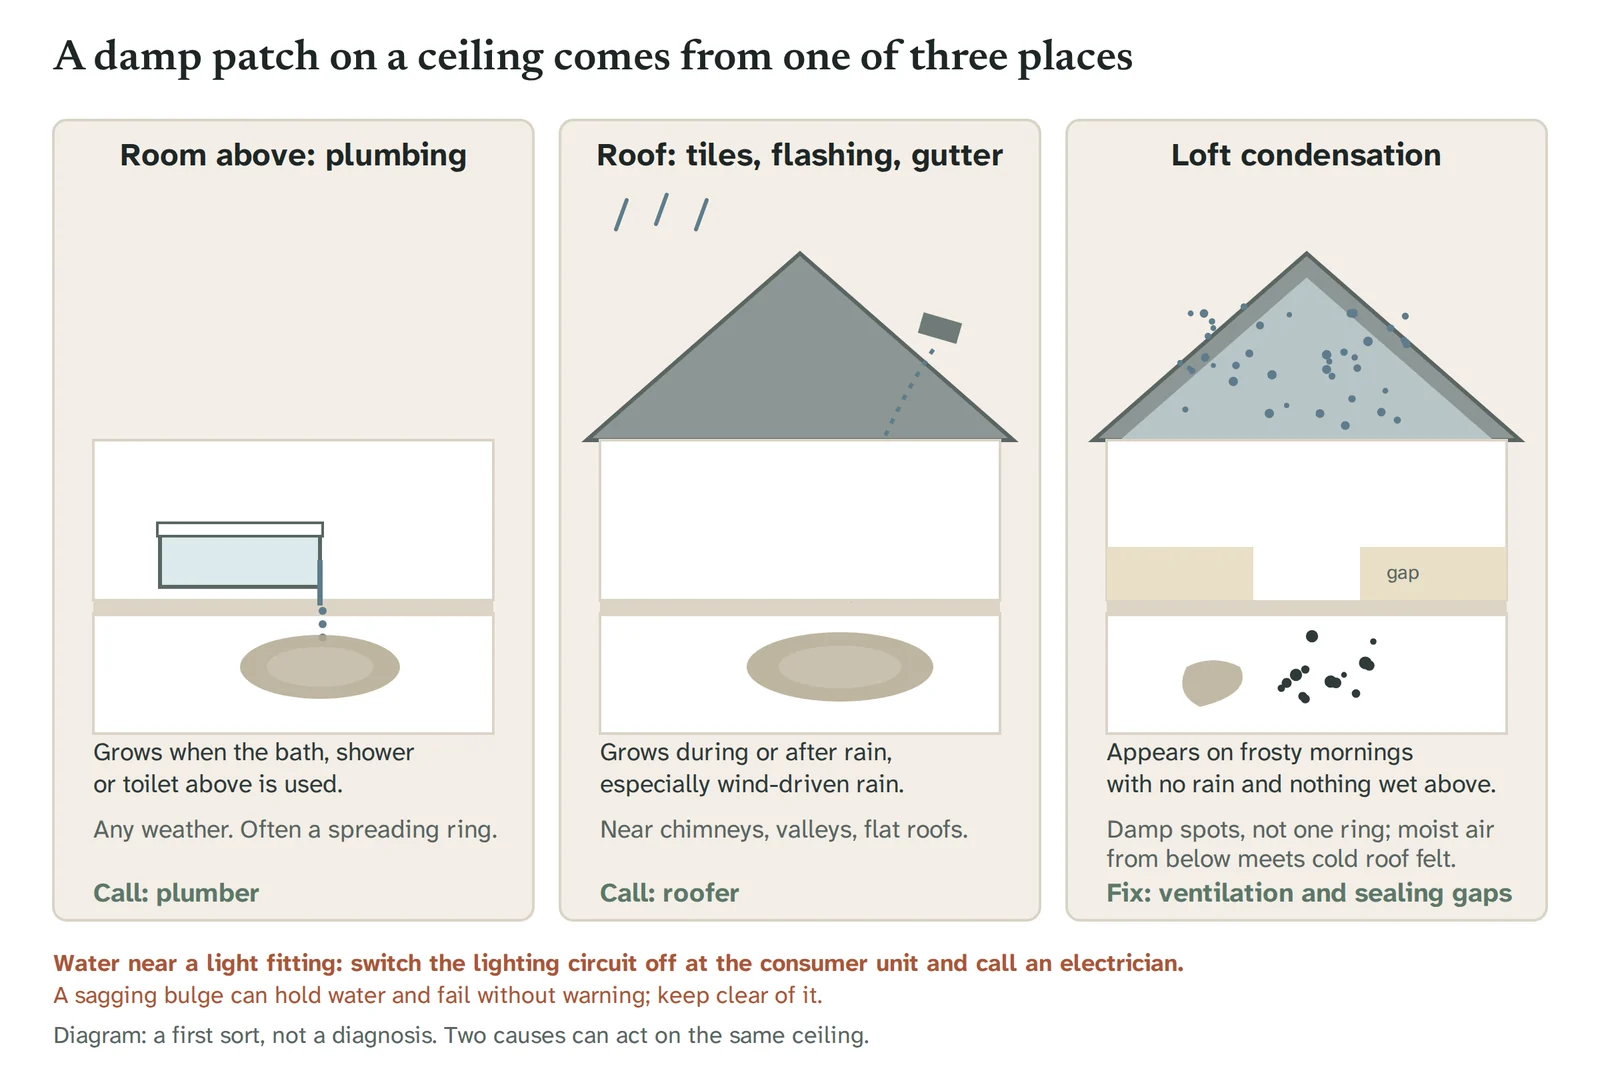
A damp patch on a ceiling is water arriving from one of three places: a fitting or pipe in the room above, the roof or loft space, or condensation forming in the loft or on a cold ceiling. Work out which before you touch the stain. A patch that grows when the bath or shower above is used points to plumbing, one that grows during or after rain points to the roof, and one that appears on cold, frosty mornings with no rain and nothing wet above is usually loft condensation. If water is anywhere near a light fitting, or the plasterboard is bulging, stop and get help before doing anything else.
On this page
- Why the source matters more than the stain
- Cause-finding table
- Loft condensation, the cause nobody mentions
- Safe checks you can do
- Who to call for each cause
- What not to do
- After the fix: drying, sealing and when to replace the board
- Renters: who to report to and what Awaab's Law means
- Is a water stain on a ceiling serious?
Why the source matters more than the stain
A ceiling stain is the symptom. Painting over it, or even replacing the board, does nothing to the water that made it, and the patch comes back within weeks. Find where the water enters, stop it, let the ceiling dry, and only then deal with the mark.
Water on a ceiling has come down from somewhere, which narrows the options. Rising damp does not reach ceilings; if the wall below the patch is damp too, the water is running down from above, and the penetrating damp guide covers where it gets in. The Government’s damp and mould guidance describes four routes for moisture into a home: condensation, penetrating damp from outside, rising damp from the ground, and traumatic damp, “caused by leaking water from waste and heating pipes, overflowing baths or sinks, burst pipes or defective water storage vessels inside the building”. For a ceiling, only three are in play: penetrating (roof), traumatic (plumbing above) and condensation. If you are unsure whether it is damp at all, or condensation that dries away each morning, see the damp or condensation guide.
Cause-finding table
This is a first sort, not a diagnosis. Two causes can act on the same ceiling, and a roofer or plumber may find something the pattern did not suggest.
| Likely source | Where the patch sits | How it behaves | Typical look |
|---|---|---|---|
| Plumbing in the room above (bath or shower tray seal, toilet, pipe joint, radiator valve, water tank) | Directly under a bathroom, kitchen, en suite, airing cupboard or radiator | Grows or drips when that fitting is used; damp at any time of year regardless of weather | Wet to the touch, may drip, brown ring that spreads outward; plasterboard can sag |
| Roof (slipped or cracked tiles, chimney flashing, roof valleys, flat roofs, skylights, blocked gutters) | Top-floor ceilings, often near a chimney breast, a valley between two roof slopes, a flat-roofed extension or a rooflight | Grows during or after heavy rain, especially wind-driven; dries between wet spells | Brown or yellow tidemark that darkens after storms; sometimes damp insulation above |
| Loft condensation | Top-floor ceilings, often over bathrooms and bedrooms; the “no leak” cases | Appears in cold snaps or after frosty mornings with no rain; damp insulation, or drips from the underside of the felt | Scattered damp spots or general dampness rather than one ring; often no stain until it has happened many times |
| Cold-ceiling condensation with mould | Top-floor rooms under a poorly insulated loft, corners and edges of the ceiling | Worse in winter, worse in rooms where a lot of moisture is made | Black speckles rather than a brown ring; see mould on the ceiling |
| Chimney breast salts and old flue moisture | On or beside a chimney breast, upstairs or down | Slow, does not track rainfall closely; can look worse in humid weather | Brown or yellow staining, sometimes a white crust of salts (efflorescence) on the plaster |
| Old stain from a leak already fixed | Anywhere a previous leak was | Dry to the touch, does not grow, same size month after month | Faded brown ring, no softness in the board |
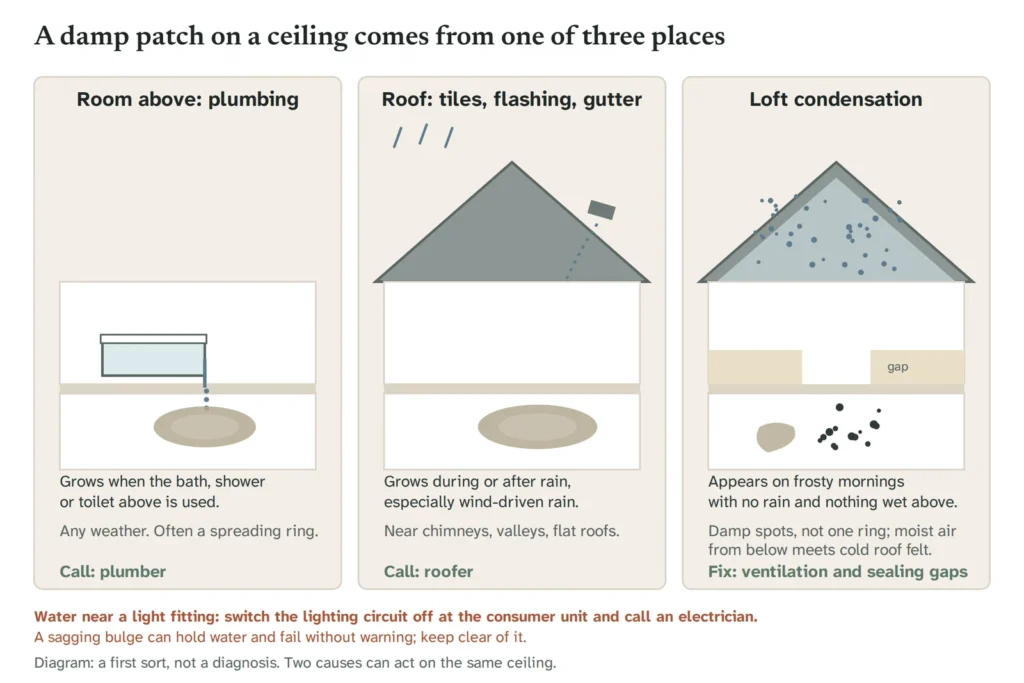
A few points the table cannot show:
- “Damp patch on ceiling but no leak” is what most people search after the plumber finds nothing. It usually means loft condensation or a cold ceiling, not a hidden pipe.
- Under a bathroom or shower is the most common location and the easiest to test, because you can run each fitting on its own and watch.
- After heavy rain does not always mean the roof covering has failed. Blocked gutters and overflowing hoppers push water back under the eaves, and wind-driven rain finds gaps in flashing and around rooflights that stay dry in a normal shower.
- After frost almost always points to condensation in the loft, because a frosty night is when the underside of the roof is coldest.
Loft condensation, the cause nobody mentions
Warm, moist air from showers, cooking and drying clothes rises into the loft through gaps around loft hatches, pipe runs, downlighters and ceiling cracks. The Energy Saving Trust puts the moisture a typical household produces at up to 100 litres a week, and a share of that ends up in the roof space.
In the loft the air meets the underside of the roofing felt or tiles, which on a cold night can be at or near outdoor temperature. Condensation forms when a surface is at or below the dew point of the air touching it (the temperature at which air can no longer hold its water vapour). Water beads on the felt, runs to the lowest point, and drips onto the insulation and the ceiling below. On a frosty morning the drips are worst, and the patch appears with no rain and no leak.
Three things make this more likely:
- Thick insulation with no ventilation at the eaves. Insulation keeps the loft colder, which is the point, but a loft sealed at the eaves cannot clear the moist air. The Government guidance recommends loft insulation to a minimum of 270 mm; that thickness works only when the loft can breathe.
- Extractor fans or tumble dryer vents that discharge into the loft instead of outside. Worth checking from the loft hatch.
- A bathroom or kitchen directly below with no working extractor, so moist air takes the ceiling route. The reduce humidity guide covers the fan and window habits that cut this at source.
Loft condensation is fixed by ventilation and by sealing the routes moist air takes into the loft, not by patching the ceiling or replacing the roof.
Safe checks you can do
These checks point to the likely source. They do not replace an inspection by a plumber, roofer or surveyor, and none involves a ladder, the roof or electrics.
Before you start
- If the patch is near a light fitting, a downlighter or a smoke alarm, or water is dripping from any fitting, turn the lighting circuit off at the consumer unit and call an electrician. Do not touch the fitting or try to dry it, and do not put the circuit back on until it has been checked.
- If the plasterboard is bulging or sagging, keep away from it and keep children and pets out of the room. A bulge can hold a lot of water and fail without warning. Call a professional rather than pressing it or pushing a screwdriver in to “let the water out”.
- Put a bucket under any drip. If water is pouring rather than dripping, turn off the mains stopcock and call a plumber.
- Never go onto the roof, and do not lean out of windows to look at gutters.
Checks in order
- Touch test (dry areas only). Press the flat of your hand against the patch, well away from any electrics. Cold and clammy suggests active water; dry, firm and the same temperature as the rest of the ceiling suggests an old stain. Softness or crumbling means the board itself is water-damaged.
- Map the patch. Photograph it with something for scale and mark the edge lightly in pencil. Repeat after the next heavy rain, the next frosty night, and the next use of the bath or shower above. Whichever event moves the pencil line is your answer.
- Look directly above. Work out what sits over the patch: a bath, shower tray, toilet, basin, radiator, water tank, hot water cylinder, or a pipe run under floorboards. In a bathroom, check the silicone seal around the bath or tray, the seal where the shower screen meets the tray, and the grout. These fail quietly and leak only while the shower is running.
- Run the fittings above one at a time. Fill and empty the bath. Run the shower for ten minutes with the door or screen in its normal position. Flush the toilet several times. Run the basin. Between each, go down and feel the patch for new dampness. Testing one fitting at a time separates a shower seal from a toilet pan connector.
- Check the loft only if it is safe. Only with a fixed ladder or safe access, proper boarding to stand on, and light. Do not walk on joists or insulation. From the hatch, look for damp or discoloured insulation over the patch, water beads on the underside of the felt, a pipe or tank overhead, and any fan duct that ends inside the loft. If you cannot do this safely, a roofer, plumber or surveyor can. Do not disturb old insulation or any dusty board or coating you cannot identify.
- Check outside from the ground. After rain, look for overflowing gutters, downpipes discharging against the wall, and any obvious slipped tile. That is as far as ground-level inspection goes.
Who to call for each cause
| What you found | Who deals with it |
|---|---|
| Patch grows when a bath, shower, toilet or basin above is used; pipe joint, radiator or tank suspected | Plumber (a bathroom fitter for a failed shower tray or screen seal) |
| Patch grows during or after rain; near a chimney, valley, flat roof or rooflight; gutters overflowing | Roofer (for a flat roof, one who works with that covering). Gutter clearing is a roofer or gutter specialist, not a household ladder job |
| Loft condensation: damp on felt or insulation, no rain link, worse after frost | A roofer or ventilation installer for eaves and roof vents; an electrician for any fan that needs rewiring or ducting to an outside grille |
| Water near a light fitting or dripping from one | Electrician, after switching the lighting circuit off at the consumer unit |
| Chimney breast staining | A roofer for the flashing and pointing at the chimney; a damp or building surveyor if the stain persists once the outside is sound |
| Sudden escape of water (burst pipe, tank failure, overflowing bath from a flat above) | Plumber first, then your home insurer. Buildings and contents policies often cover escape of water, but policies vary, so check the wording and report promptly |
| Rented home, any cause | Your landlord, letting agent or housing association (see the renters section) |
| Ceiling sagging or the cause still unclear after the checks | A chartered surveyor or independent damp specialist with no product to sell |
For bigger or structural damp work, the Energy Saving Trust suggests getting quotes from three TrustMark-certified professionals.
What not to do
- Do not paint over the stain until the cause is fixed and the ceiling is dry. Paint traps moisture in the board, the stain bleeds through emulsion, and you lose the one clue that shows whether the problem has stopped.
- Do not sand, scrape or drill textured coatings in homes built or refurbished before 2000. The Health and Safety Executive warns that asbestos may be present in buildings from before 2000, including textured coatings, and that suspect materials should not be sanded, scraped or drilled. If the stained ceiling has an Artex-type finish and the house is that age, get it checked before any repair that disturbs it.
- Do not poke a sagging bulge. It may be holding water and can come down.
- Do not add loft insulation or block eaves vents as a quick fix for a “cold” ceiling before the loft ventilation has been looked at. More insulation in an unventilated loft can make condensation worse.
- Do not accept a quote for a full new roof or a chemical treatment on the strength of a ceiling stain alone. Ask what the tradesperson found and why it explains the pattern you mapped.
After the fix: drying, sealing and when to replace the board
Once the source has been stopped, the order is: dry, seal, paint. Skipping the first step wastes the other two.
- Let it dry fully. Heat the room normally, keep it ventilated, and give the ceiling days to weeks depending on how wet it was, until the patch matches the rest of the ceiling to the touch. Fans and a dehumidifier speed this up; a heater pointed straight at wet plasterboard can crack it.
- Check the board. Once dry, press around the patch. Board that stays soft, sags, crumbles at the edges or has lost its paper face needs replacing, not painting. A small area can be cut out and patched; a large area, or any ceiling with a textured coating in a pre-2000 home, is a job for a tradesperson.
- Deal with any mould first. Black or green speckles on a damp ceiling are surface mould and need cleaning before decoration. The mould on ceiling guide covers what is safe to do yourself and when to leave it to a professional. Never use bleach and a vinegar or acid-based cleaner on the same patch, one after the other: the combination releases chlorine gas.
- Stain block, then paint. Brown water stains bleed through emulsion. Use a stain-blocking primer made for water marks, let it cure as the tin says, then repaint. Prime only once the ceiling is fully dry or the stain returns.
- Keep the pencil line for a while. If the mark grows again in the next wet or cold spell, the cause was not fully fixed.
Renters: who to report to and what Awaab’s Law means
A ceiling leak is not yours to fix, but it is yours to report, in writing and with photos, as soon as you see it. Keep a copy.
- Private tenants: report to the landlord or letting agent. If nothing happens, the council’s environmental health team can inspect.
- Council and housing association tenants: report to the housing office or repairs line and note the reference number.
- Leak from the flat above: the landlord or managing agent coordinates access and sorts out whose insurer pays. You do not need to negotiate with the neighbour yourself, although a polite word may get a tap turned off faster.
Since 27 October 2025, social landlords in England (councils and housing associations) have been under Awaab’s Law. According to Shelter’s summary, they must investigate a potential hazard within 10 working days, make significant damp and mould hazards safe within 5 working days of identifying them, complete emergency safety works within 24 hours, and offer alternative accommodation if they cannot. A dripping or sagging ceiling, or a patch with spreading mould, is the kind of hazard this is aimed at. Further phases of Awaab’s Law for social landlords follow in October 2026 and October 2027. Private renters are due to be brought under similar rules through the Renters’ Rights Act at a later date.
The Government’s damp and mould guidance is blunt that it is “totally unreasonable to blame damp and mould in the home on ‘lifestyle choices'”, and says landlords should not wait for medical evidence before acting. If anyone in the home is in a higher-risk group, say so in the report. For disputes, Shelter, Citizens Advice and GOV.UK have guidance; this site does not give legal advice.
Is a water stain on a ceiling serious?
An old, dry, unchanging stain is cosmetic. A stain that is damp, growing, dripping, or near a light fitting is a live problem: water in plasterboard weakens it, wets cables and joists, and feeds mould. Water near electrics and a sagging bulge need same-day action.
Next step
Sources
- Understanding and addressing the health risks of damp and mould in the home, GOV.UK (DLUHC and UKHSA), updated 1 April 2026
- Fixing damp and condensation, Energy Saving Trust, updated 22 May 2026
- Asbestos, Health and Safety Executive
- How Awaab’s Law changes the rules on hazards in social housing, Shelter, October 2025