
Penetrating Damp: Signs, Causes and How to Fix It
How to tell if you have penetrating damp: patches that grow after rain, where the water gets in, what you can fix yourself and when to call a roofer.
Quick answer
Penetrating damp is water from outside getting through a wall, roof, window or floor because something has failed: a slipped tile, a leaking gutter, crumbling pointing, a cracked sill. The tell-tale sign is a damp patch that gets bigger or wetter after rain and sits in line with a fault you can find on the outside of the house. Fix the fault first. The patch then dries over weeks to months, and only after that is it worth redecorating.
On this page
- What penetrating damp is
- How to tell if you have penetrating damp
- Penetrating damp signs compared with condensation and rising damp
- Where the water gets in: the usual UK causes
- The look-from-the-ground check after rain
- How to fix penetrating damp: what you can do and what needs a trade
- Does building insurance cover penetrating damp?
- Drying out after the fix
- If you rent
- Common mistakes
- What to read next
What penetrating damp is
Manchester City Council puts it plainly: this type of dampness “only appears because of a defect outside letting water pass from the outside into the home. For example, a missing tile or slate, spilling from a blocked gutter, badly fitted windows or missing pointing.” It is found on external walls, or on ceilings where the roof is the problem. The Energy Saving Trust describes it the same way: water “seeps through walls from the outside”, often because of “faulty guttering or roofing”, and it “can get worse when it rains”, showing up “as a concentrated damp patch on surfaces”.
That definition rules things out. Damp on an internal partition wall with no outside face is not penetrating damp, and damp that follows the seasons but not the weather is more likely condensation. Water coming through a wall needs a route, and the route is a defect, not the age of the house.
How to tell if you have penetrating damp
Three questions do most of the work.
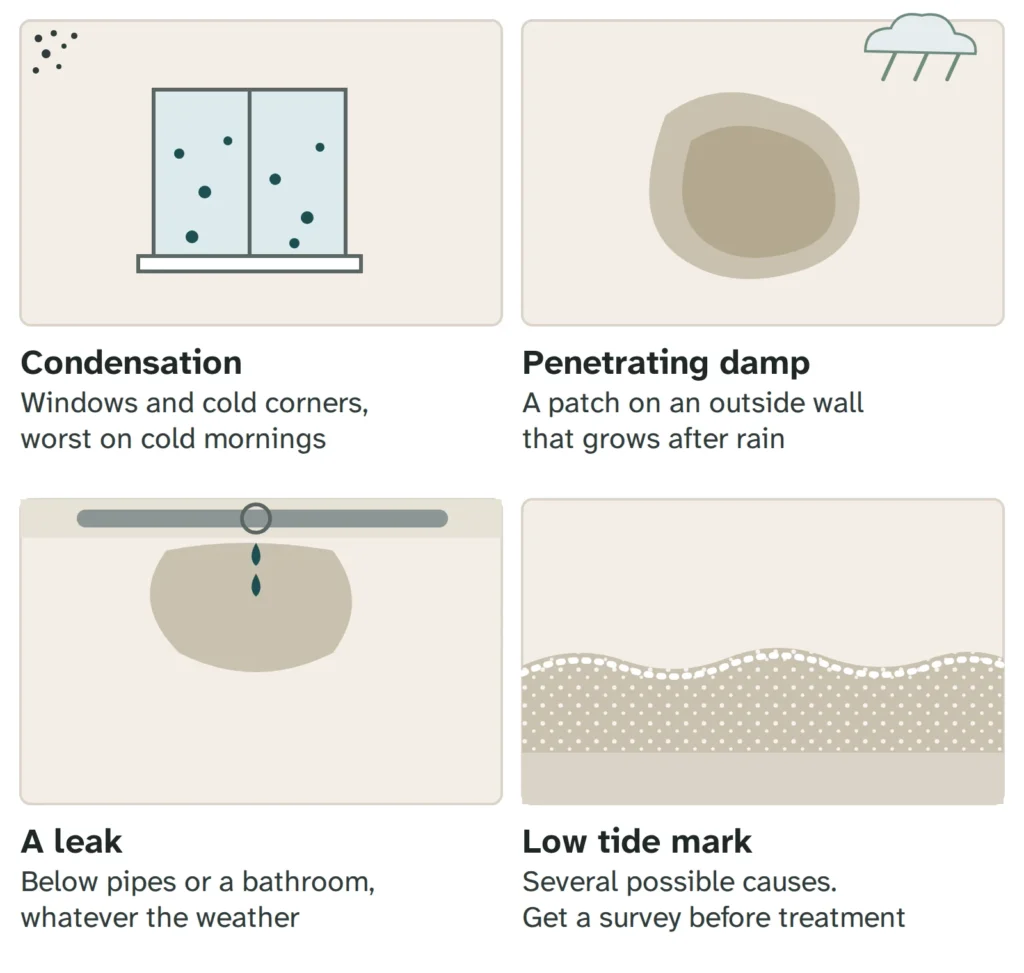
- Does the patch follow the rain? A patch that darkens, spreads or feels wetter within a day or two of heavy or wind-driven rain, then slowly fades in a dry spell, is behaving like penetrating damp. Condensation follows the cold and your daily routine instead: worse in the morning, worse in winter, worse after showers and cooking.
- Is there a fault outside, in line with it? Stand outside and look at the same spot on the exterior: a blocked gutter above, a dripping downpipe joint, green algae on the brick, missing mortar, a cracked sill, a flat roof edge. If you cannot find anything, keep an open mind.
- Is it a defined patch rather than a general film? Manchester City Council notes that penetrating damp “will usually appear as a well-defined ‘damp patch’ which looks and feels damp to the touch”. Condensation tends to be a wider, thinner dampness across cold surfaces, with black mould speckles in corners and behind furniture.
The same council page adds that “Black mould is rarely seen on areas of penetrating dampness”, because the area is usually too wet and the water carries salts that discourage mould. A very wet patch with a tide line of white crystals but little mould points towards water coming through the wall; lots of black mould on a slightly damp surface points towards condensation.
None of these checks is a diagnosis. They tell you where to look and who to call.
Penetrating damp signs compared with condensation and rising damp
| What you see | Penetrating damp | Condensation | Rising damp |
|---|---|---|---|
| Where | External walls at any height; ceilings under roofs; around windows and chimneys | Cold surfaces: window reveals, corners, behind furniture, north-facing walls | Ground-floor walls only, from the skirting up |
| Shape | A defined patch, often with a darker centre and lighter rim | A general film or scattered speckles, no hard edge | A horizontal tide mark, usually within about a metre of the floor |
| Timing | Worse after rain; fades in dry weather | Worse in cold weather and mornings; follows showers, cooking, drying washing | Fairly constant year round |
| Surface | Wet to the touch; blown plaster; peeling paper; brown or yellow staining | Water droplets on glass and paint; black mould in corners | Crumbling or salty plaster at low level; rotting skirting; white salt deposits |
| Mould | Rare on the wet patch itself | Common, usually black | Uncommon on the tide mark itself |
| Outside | A matching fault above or beside the patch | Nothing to see outside | Raised paths, flower beds or render bridging the damp-proof course |
The Energy Saving Trust’s rule of thumb: a “tidemark of damp occurring at the bottom of a wall” points to rising damp, while penetrating damp shows up as a concentrated patch. Our guide to telling damp from condensation covers the foil test and other household checks, and rising damp signs explains why rising damp is so often misdiagnosed.
Where the water gets in: the usual UK causes
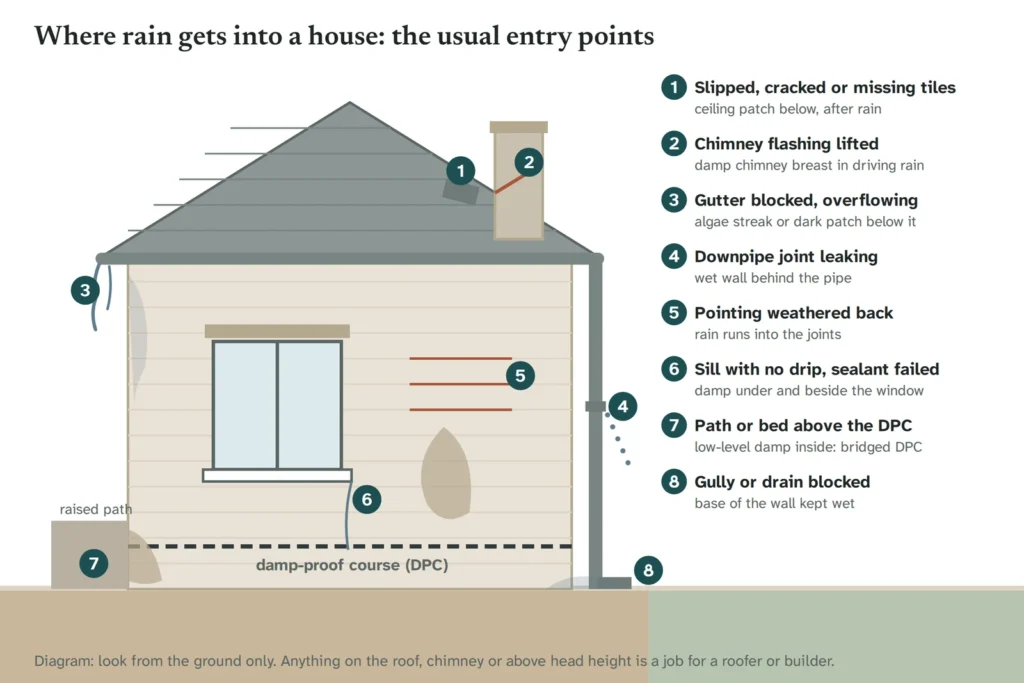
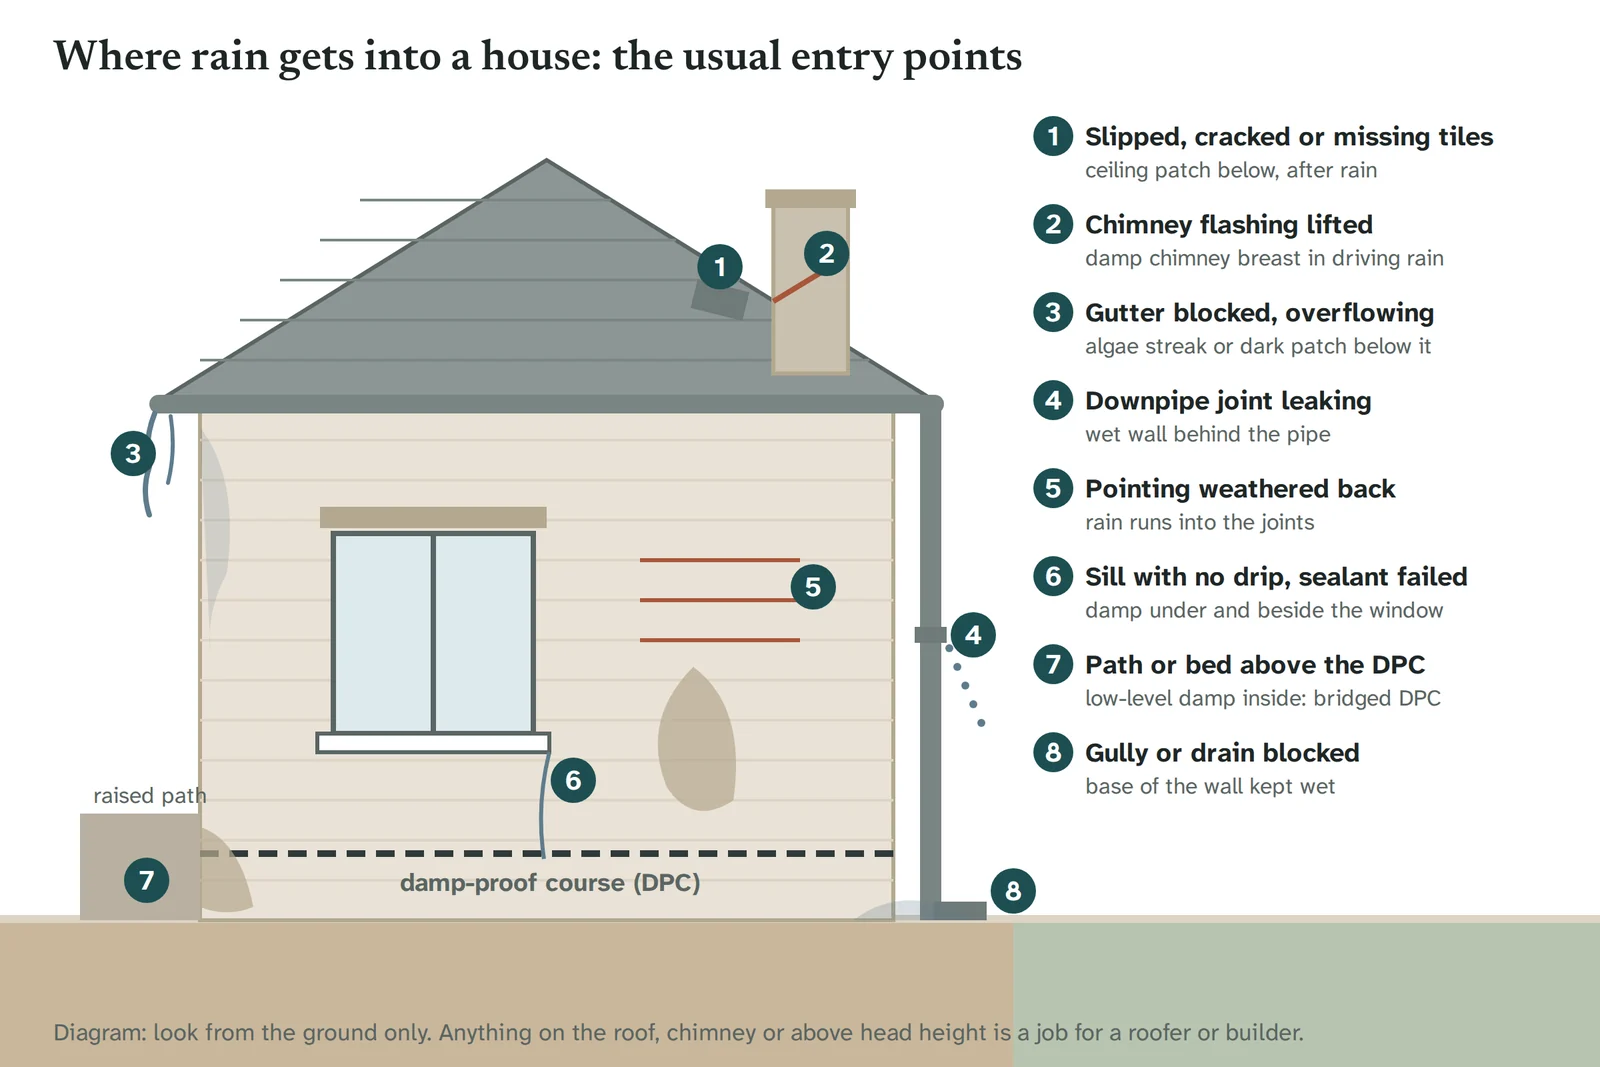
Work from the top of the house down. The Property Care Association, the trade body for damp specialists, singles out “blocked guttering and defective fall pipes” as a common cause alongside “poor pointing, defective roof coverings, and flashings”.
Roof
- Slipped, cracked or missing tiles and slates. Water can travel a long way along a rafter before it shows on a ceiling.
- Flashing. The lead or substitute strips where the roof meets a chimney, wall or dormer. Lifted or cracked flashing is a classic cause of a damp chimney breast.
- Valleys. Where two roof slopes meet. Blocked with moss and leaves, or with a split lining, a valley sends water sideways under the tiles.
A ceiling patch that grows after rain nearly always starts here. Our guide on a damp patch on the ceiling covers telling a roof leak from a plumbing leak.
Gutters and downpipes
- Blocked gutters overflow in heavy rain and pour down the wall below. The give-away is a vertical streak of green algae or a dark stain under one section.
- Leaking joints and brackets drip onto the same spot for years.
- Downpipes that discharge onto the wall or into a blocked gully soak the base of the wall and can be mistaken for rising damp.
This is the most common and cheapest cause to put right, and the one most often missed because nobody looks up in the rain.
Walls
- Failed pointing. The mortar between bricks weathers back over decades. Once it is recessed or missing, rain runs into the joints instead of off them.
- Cracked or hollow render. Render that has come away from the wall (it sounds hollow when tapped) holds water in the gap and can make a wall wetter than bare brick.
- Porous and spalled brick. Soft bricks soak up water, and bricks whose faces have blown off through frost damage (spalling) soak up more. Solid walls with no cavity, common in homes built before the 1920s or 1930s, rely on drying out between storms; an exposed, west-facing elevation may not get the chance.
- Cavity problems. The gap in a cavity wall is meant to stop water crossing from the outer leaf to the inner one. Mortar droppings on wall ties, debris at the base of the cavity, or badly fitted ties can bridge the gap. This shows as isolated patches at random heights rather than a tide mark.
- Wet cavity wall insulation. Blown insulation in a wall that faces driving rain, or behind an outer leaf in poor condition, can hold water against the inner leaf. The symptom is patches on the inside of an exposed elevation that never fully dry. This needs a specialist assessment, not another coat of paint.
Openings
- Window and door sealant. The mastic between frame and masonry cracks and shrinks with age. Rain runs behind the frame and shows at the corners of the reveal or below the sill.
- Sills without a drip. A sill should throw water clear of the wall. One with no groove underneath, or with the groove rendered or painted over, lets water track back into the wall.
- Cracked or missing sill and coping stones, especially on parapets and bay windows.
Ground level
- Raised paths, patios, decking and flower beds. If the outside ground has been built up above the damp-proof course (the barrier near the base of a wall that stops ground moisture rising), rain soaks the wall above the barrier. RICS notes that rising damp “is often misdiagnosed” and that failure of an original damp-proof course “is extremely rare”; a bridged course from raised ground is a far more common cause of low-level damp, and it is penetrating damp in disguise.
- Blocked or broken gullies and drains that keep the base of a wall wet.
Flat roofs, balconies and extensions
Felt and asphalt flat roofs have a limited life. Ponding water, cracked edges, and the joint where a flat roof meets the house wall are frequent sources of damp in the room beneath. Balconies with failed waterproofing under the tiles or decking do the same.
The look-from-the-ground check after rain
No ladder is needed, and you should not use one. A few hours after heavy rain has eased, walk round the outside with your phone.
- Photograph each elevation, then zoom in on the area directly outside the damp patch. Date every photo.
- Look up at the gutters: water spilling over the edge, plants growing in them, sagging sections.
- Follow each downpipe down. Wet streaks below a joint, or a puddle at the base, mean it is leaking or the gully is blocked.
- Look at the brickwork for dark areas that stay wet longer than the rest, green algae, white salt crystals (efflorescence, the residue left when water evaporates from masonry) and washed-out mortar.
- Tap render gently with a knuckle. A hollow sound means it has come away from the wall.
- Check windows and doors for gaps in the sealant, sills with no drip groove, cracked sill stones.
- Look for paths, soil or decking higher than the damp-proof course, often visible as a thin black or slate line two or three bricks up.
- Look at the roof only from the ground or an upstairs window. Slipped tiles and lifted flashing are often visible. Anything else is a roofer’s job.
Keep a rain-timing diary
For two or three weeks, note the weather each day and how the patch looks: dry, slightly damp, wet, spreading. Photograph it from the same position every few days. A patch that peaks one to two days after heavy rain and recedes in dry spells is behaving like penetrating damp. A patch that peaks after cold nights and steamy mornings, regardless of rain, is behaving like condensation on walls. A patch that never changes is more likely a plumbing leak or rising ground moisture. This diary is worth more to a surveyor than any single visit, because they usually turn up on a dry day.
How to fix penetrating damp: what you can do and what needs a trade
Penetrating damp is fixed outside, at the point of entry. Nothing applied to the inside of the wall stops water coming through it.
Jobs a homeowner can reasonably do
- Clear gutters from the ground with a gutter-cleaning attachment on a telescopic pole or a curved hose attachment, twice a year: after autumn leaf fall and again in spring.
- Clear gullies and drain grates at the base of downpipes.
- Reseal around ground-floor windows and doors with an exterior-grade sealant after removing the old bead completely.
- Lower raised soil or gravel so it sits below the damp-proof course, and keep a gap between the wall and any raised bed.
- Repoint a small area at low level if you are a competent DIYer, using a mortar that matches the original (lime on older solid walls, not hard cement, which cracks and traps water). Larger areas, anything above head height, and chimneys are for a builder.
Jobs that need a roofer, builder or specialist
- Any roof work: tiles, slates, flashing, valleys, flat roofs.
- Repointing or rendering more than a small low-level patch, or any work on chimneys and parapets.
- Cavity wall investigation: a borescope check for bridged ties, debris or wet insulation, and extraction of insulation where that is the cause.
- Replacing sills, copings and lintels.
- Anything involving a ladder or scaffold.
Roofs: a roofer. Walls and openings: a general builder. If the cause is not obvious, or trades are each blaming another, pay an independent surveyor with no products to sell. RICS advises asking for an inspection that follows the Joint Position Statement on damp investigation, carried out by someone with no commercial interest in the outcome. The Energy Saving Trust suggests getting “quotes from three TrustMark-certified professionals”, TrustMark being the government-backed quality scheme for work in and around the home. We do not publish prices: the range runs from a free gutter clear to a re-roof and depends entirely on the cause.
“Penetrating damp treatment” firms and water-repellent creams
Search for penetrating damp and most of what comes back is companies selling a treatment: a masonry cream, a wall coating, or a damp-proofing package. Some have a place, for example on a sound but porous brick wall that has been repointed and still takes in driving rain. But a firm whose income depends on applying a coating is not a neutral diagnosis, and a coating over a leaking gutter or failed flashing only delays the real repair.
Older solid-walled houses need particular care. These walls take in some water and release it again through breathable lime mortar and plaster. The Society for the Protection of Ancient Buildings (SPAB) says it has “not historically supported the use of colourless water-repellents on historic masonry”, and that “there is uncertainty about the effects of water-repellents on the long-term performance of walls”, particularly their vapour permeability, which it is researching with UCL. Historic England’s approach is to find the moisture route and fix it with materials that let the wall breathe; its guide to assessing damp in historic buildings is the reference to hand to any surveyor of a pre-1919 house.
The order is: find the defect, fix it, let the wall dry, and only then consider a breathable water repellent on a wall that still struggles in driving rain.
Does building insurance cover penetrating damp?
Policies vary, and we cannot tell you what yours says. Many buildings policies treat damage from a sudden event (a storm that strips tiles, a burst pipe) differently from damage that has built up gradually through wear and tear or lack of maintenance, and penetrating damp from a long-blocked gutter or decades-old pointing tends to fall into the second group. Some policies exclude damp altogether. Read the wording and, if in doubt, ask the insurer before you commission work. If a claim is refused and you think that is wrong, Citizens Advice can explain your options. This is not legal or financial advice.
Drying out after the fix
Once the outside defect is repaired, Manchester City Council’s advice is that “the damp patch should fade and dry out over time”. A cavity wall that took a few months of gutter overflow may dry in weeks; a solid brick or stone wall soaked over years can take months. Leave decoration until the patch has stayed dry through a wet spell.
Plaster that has blown (come away from the wall and sounds hollow) or keeps producing white salt crystals will usually need hacking off and replacing once the wall is dry, because the salts attract moisture from the air and keep the surface looking damp. Where black mould has grown on the drying patch, our guide to removing mould from walls covers what is safe to clean yourself.
If you rent
Repairs to the structure and exterior are the landlord’s responsibility. Report the damp in writing with dated photos and your rain diary, to the landlord or letting agent for a private tenancy, or to the housing association or council for social housing. Keep copies.
If you rent from a council or housing association, Awaab’s Law applies. From 27 October 2025, social landlords must investigate a potential hazard within 10 working days, make significant damp and mould hazards safe within 5 working days of identifying them, complete emergency works within 24 hours, and offer alternative accommodation if they cannot. Further phases follow in October 2026 and October 2027. Private renters are due to be covered under the Renters’ Rights Act at a later date; in the meantime, if a private landlord does not act, the council’s environmental health team can inspect and require repairs. Shelter and Citizens Advice can explain the process.
Common mistakes
- Painting over the patch. Stain-block paint hides the mark until the next storm. The wall is still wet.
- Buying a dehumidifier as the fix. It helps a room dry out after the repair; it does not stop water coming through the wall.
- Assuming it is rising damp because it is low down. Check the ground level and the downpipe first. RICS calls rising damp a moisture route, not a conclusion.
- Accepting a diagnosis from someone selling the cure. Get an independent view if the recommended fix costs more than a few hundred pounds.
- Sealing an old solid wall with cement render, hard cement pointing or a waterproof coating without fixing the defect. The water still gets in and now cannot get out, and hard mortar makes soft brick faces spall.
- Trusting a damp meter reading on its own. RICS notes that these meters measure electrical conductivity and can read high because of salts and other conductive materials, not just water.
What to read next
If the patch is on the ceiling, start with our guide to a damp patch on the ceiling. If you are still not sure whether the problem comes from outside or from the air in the room, damp or condensation sets out the household checks side by side. The damp identification hub links every guide in this section.
Sources
- Penetrating dampness, Manchester City Council
- Fixing damp and condensation, Energy Saving Trust, updated 22 May 2026
- Penetrating damp, Property Care Association
- Damp and mould consumer guide, RICS, 16 June 2025
- Research into water-repellents on solid walls, SPAB, 20 July 2020
- Assessing Damp in Historic Buildings, Historic England, 13 July 2026
- How Awaab’s Law changes the rules on hazards in social housing, Shelter, October 2025
- Understanding and addressing the health risks of damp and mould in the home, GOV.UK, updated 1 April 2026